
Here are the supplies I used and about how much I spent.
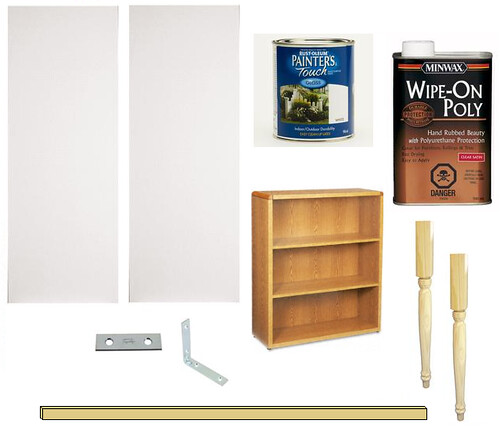
(2) 24"x80" interior doors - $20/each = $40
(2) 29" table legs - $12/each = $24
White interior latex paint = $10
Wipe-on polyurethane (clear gloss) = $10
29" high bookshelf = free
(Make sure the bookshelf is the same height as your table legs.)
(4) "L" brackets and (1) flat bracket = about $4
Piece of lumber sized 1"x2"x96" = $8
(The wood board needs to be about the same length as long side of a door + short side of door, which for me was 80" + 24" = 104", but 96" was plenty long enough to support it.)
TOTAL for entire desk = about $96
The first step is mounting the wood board to the wall. This is going to support one side of the desk, like this:

My bookshelf and table legs were all 29" tall, so we obviously mounted the board so that the top of it was at a height of 29".
Before you start to put together the rest of the components, paint everything white.
Next attach the two table legs to one side of a door. I didn't take a picture but it looked like this, thanks Google.

Then it's simply a matter of setting the doors onto their various supporting elements. One door is supported by the bookshelf on one end, and the wood board on the other.
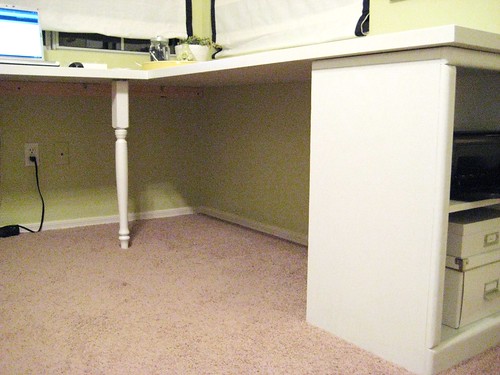
The other door is supported by the two legs on one side, and the board on the other.
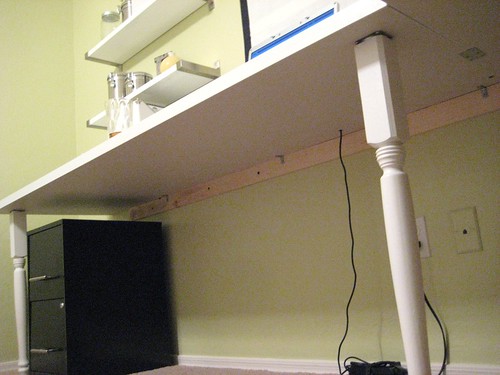
We used a little wood glue on top of the wall board and on top of the bookshelf to keep the doors from sliding. Then connect everything together with the brackets and drill a hole where you want your computer cord. Finally I wiped on two coats of clear polyurethane after it was all put together.
Done and done my friends.

Now you're all very sick of my office. I'll talk about something else tomorrow I prom prom promise.
I love it! This is such a great idea!
ReplyDeletek shut up you are amazing. i absolutely love this. your whole office is perfect.
ReplyDeleteUm. Wow.
ReplyDeletethis door desk is super duper. wish i had a spot in my house to do this project, but alas, the kids have taken over every square inch! MUST GET BIGGER HOUSE!
ReplyDeleteI feel inspired.
ReplyDeleteIs that G-ma's crappy bookshelf you painted and used at the end? You crafty clever girl.
ReplyDeleteChris
Wow, that is such a creative way to design a desk. Love your new blog!
ReplyDeleteDo you ever work in your office? Or does it always look like this....
ReplyDeleteThank you for sending this link--I didn't even look at the date I was so excited to see exactly what I needed for my home office! These instructions are great--it doesn't seem too complicated. I might actually be able to do this. All I need is a free/cheapy bookshelf--time to hit up some yard sales! Thanks again.
ReplyDeleteI was looking for a craft table design that's very similar to your desk design but yours being easier than what I was working out in my head.
ReplyDeleteThanks, you saved me a lot of extra work,
Paula,
Louisiana
Hey Erica! You have inspired me to build a similar desk!! My question for you is what finish of white paint did you use? In your picture above, it says gloss, but I was concerned about the poly sticking to the gloss. Also, is the poly in the pic above the exact one you used? Sorry for all the questions! I want to make sure to get it right the first time! Thanks :)
ReplyDeleteLove the desk! I have been designing something similar in my head for a while and it is great to see your example looking so nice and easily done!
ReplyDeleteMy question is did you use the bookshelf for design and function or for extra stability? Do you think that the desk would be as sturdy by using the thin board along both walls and 3 legs instead of the shelf?
I have been checking out a few of your article stories and I must say pretty clever stuff. I will definitely bookmark your blog. Thank you very much.
ReplyDeleteI just book marked your blog on Digg and StumbleUpon.I enjoy reading your posting. thank you very much.
ReplyDeleteGreat researched articles and blog site, keep up the work!
ReplyDeleteLove it! One question, how is the polyurethane holding up over the paint?
ReplyDeletegreat idea , but having that leg there would annoy me. What i may do is instead of the leg. i would get a few wooden dowels and drillholes into the points where the two door pieces touch each other then insert the dowels into the left piece and slide them together
ReplyDeletegreat idea , but having that leg there would annoy me. What i may do is instead of the leg. i would get a few wooden dowels and drillholes into the points where the two door pieces touch each other then insert the dowels into the left piece and slide them together
ReplyDeletegreat idea , but having that leg there would annoy me. What i may do is instead of the leg. i would get a few wooden dowels and drillholes into the points where the two door pieces touch each other then insert the dowels into the left piece and slide them together
ReplyDeleteLooks great! I wanted to do this and found your on google images. It looks fab!!
ReplyDeleteMy husband and I are in the process of making this right now! Our project totalled $196 bc we had to buy some extra wood to build a bookshelf and we are staining it instead of paint so we had to buy the wood conditioner. But I still consider that SUPER affordable to redo our entire office space. I'll keep you posted. Things are looking great so far.
ReplyDeleteTHIS DIY L DESK IS AMAZING! VERY CREATIVE!So happy I found this! We have been trying to save for an L desk for a couple months. But they are so expensive and we keep finding others things as first time home buyers, that we need more than to spend $250. OR MORE on an L desk.
ReplyDeleteThank you, Thank you!
Heather
I'm wanting to turn my attic into an office/workroom for my photography: going pro. This would be fabulous for a place to work on photos; matting, etc. Thank you so much for sharing.
ReplyDeleteYou guys present there are performing an excellent job.
ReplyDeleteis bubblegum casting legitimate
When you mounted the board to the wall, how did you do it? I would love to do this but plan on using this room as a second bedroom (or nursery) when I need it.... Will it leave marks on the wall?
ReplyDeleteit's a great idea. I was really amazed with your L shaped desk
ReplyDeletegreat idea but legs looking old fashionmobiles price in pakistan
ReplyDelete